Quartz vs. Calcite: How to Tell Them Apart

Quartz and calcite are two of the most common minerals you'll find in the field, and they trip up a lot of beginners because both can turn up clear, white, gray, or tinted in almost any color. Both form crystal points, both show up in veins cutting through rock, and both can look glassy enough to pass for the other at a quick glance. The good news is that they're actually easy to tell apart once you know where to look — you just need to check a couple of physical properties instead of relying on color alone.
1. Check the hardness
Hardness is the fastest way to rule one of them out. Quartz sits at 7 on the Mohs hardness scale, meaning it easily scratches glass and steel and won't be scratched by an ordinary pocketknife. Calcite sits at 3, meaning a steel knife blade or even a copper coin will scratch it without much effort.
A simple test: try to scratch a clean, flat face of your specimen with the point of a steel knife. If the blade leaves a visible groove and the mineral itself doesn't damage the blade, you're almost certainly looking at calcite. If the blade barely marks it, or just skates across leaving nothing behind, that points to quartz.
2. Try the vinegar test (safely)
Calcite is a carbonate mineral, calcium carbonate, and it reacts with acid by fizzing as it releases carbon dioxide gas. Quartz is a silicate and doesn't react to acid at all. This makes an acid test one of the most reliable ways to confirm calcite.
You don't need anything dangerous for this. Ordinary household vinegar (diluted acetic acid) is enough — put a single drop on a clean, unpolished spot of the specimen and watch closely. Calcite will bubble or fizz, sometimes faintly enough that you need a hand lens or magnifying glass to see it clearly. Quartz will show no reaction whatsoever.
A safety note before you try it: stick to mild household vinegar rather than any stronger or more concentrated acid, wear eye protection, and do the test outdoors or in a well-ventilated space. Avoid touching the treated spot to your eyes or mouth, and wash your hands afterward. Never use strong acids like undiluted hydrochloric acid at home — they're unnecessary for this test and can cause real harm.
Get Rock Identifier free on iPhone and Android.
3. Look at how it breaks
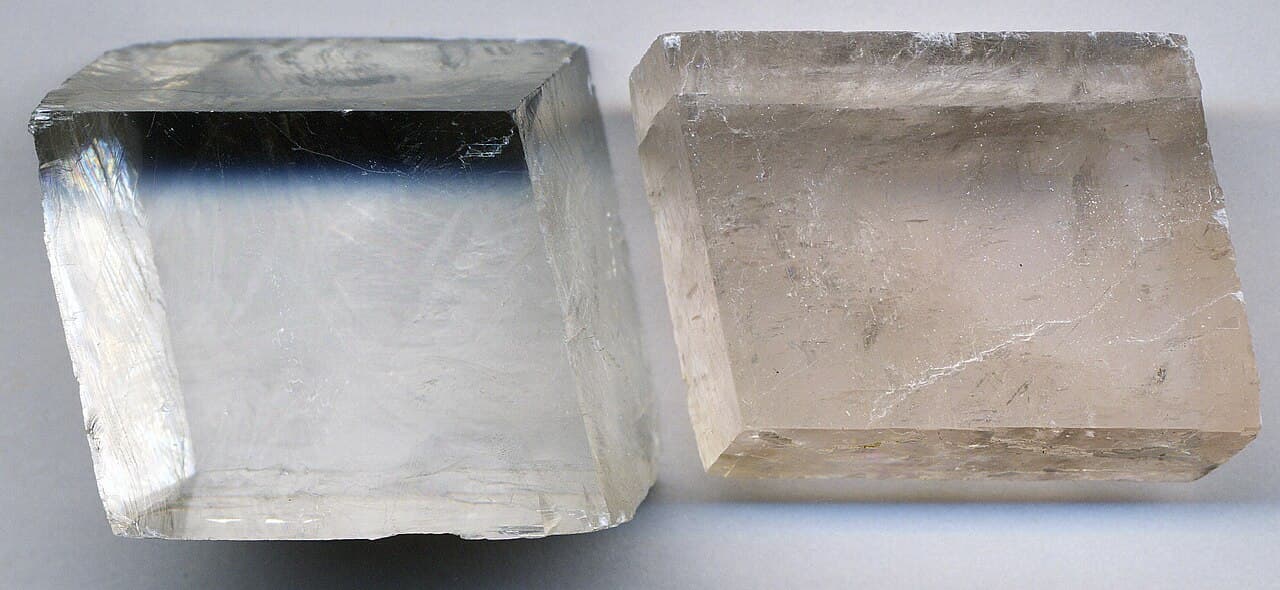
If you have a broken or chipped piece, the fracture surface itself is a strong clue. Calcite has perfect cleavage in three directions that aren't at right angles to each other, so it tends to break into small rhombohedron shapes — think lopsided boxes with slanted, flat faces meeting at consistent angles. This is one of calcite's most distinctive traits and is often visible even in small fragments.
Quartz has no cleavage at all. Instead it breaks with conchoidal fracture, leaving smooth, curved surfaces with faint concentric ridges, similar to the inside of a broken glass bottle or a scallop shell. If you see clean flat-sided steps, think calcite; if you see smooth curved scoops, think quartz.
4. Compare the luster
Luster alone won't settle the identification since both minerals can appear glassy, but it's a useful supporting clue. Quartz almost always shows a glassy, vitreous shine on its crystal faces and fracture surfaces. Calcite's cleavage faces are often vitreous too, but many specimens shift toward a duller, sub-vitreous, pearly, or even waxy look, especially on surfaces that aren't freshly broken.
If the specimen looks uniformly glassy all over with no obvious flat cleavage faces, lean toward quartz. If parts of it look slightly softer or pearly in sheen, especially near the flat rhombohedral faces, that supports calcite.
Once you've run through hardness, the vinegar test, the fracture pattern, and luster, you'll usually have a confident answer before you've even opened a reference book. From there, snap a clear, well-lit photo of your specimen showing its texture and any crystal faces, and run it through the identification tool in the app for a second opinion and more detail on the specific variety you've found.